Simple Astrophotography | Home | Astronomy | Astrophotography | Science | Space Science | Astrobiology | Science Teaching | Related Links | Contact Me
Simple
Astrophotography
Astrophotography for Beginners
Astrophotography
is as much art as it is a science when practiced by the humble amateur. If you
are like me and your Astronomy runs on a small budget, then a few hundred
dollars is all that is needed to get you on your way to what I find to be a
hobby requiring much patience and persistence, but eventually gives a great
amount of satisfaction.
Equipment:
The basic
equipment needed for your first steps into the world of astrophotography is a
SLR (single lens reflex) camera, a tripod and a cable release. You don't
necessarily have to buy all this; my first attempts were on a friends equipment.
If you are not fortunate, as I was to be able to borrow, you can pick up the
necessary equipment for a few hundred dollars second hand.
Your camera has to have
a few basic requirements. It must have a B setting (on the shutter speed
control) for long exposures and also accommodate a cable release. This will
allow you to hold open the shutter for the desired times. It is also a good idea
to have a camera has a fully mechanical shutter rather than electronic, as
batteries can be expensive and some don't work well in the cold.
My
camera and that of many other astrophotographers is an Olympus OM-1 which is
excellent for this and more advanced methods as you progress. Some of the other
features to look for if you wish to buy a camera for use in all types of
astrophotography are, mirror lock-up, interchangeable focusing screens and the
availability of magnifying eyepiece attachments.
Your tripod needs to be
sturdy, but even the flimsiest of tripods can be sturdied with the use of a
heavy object such as a brick. This is important on a windy night because a
flimsy tripod will vibrate in a strong breeze and blur your photos.
A
cable release has to be lockable, to hold the shutter open for long exposures
and a good one is not that expensive but can be hard to find.
For
astrophotography in humid conditions, a dew cap is a helpful addition to your
arsenal, allowing you to produce clearer, sharper results by eliminating
fogging. You can make these yourself without too much trouble from pipe, plastic
sheet, or even cardboard. Make sure that you don't obstruct your field of view
and colouring the inside black will help to cut down the amount of stray light
entering your lens.
The two main types of photos you can now attempt are
the star trails and basic still pictures of the constellations.
Star
Trails:
Star trails can be
very attractive and are caused by the earth's rotation on its axis, making the
stars appear to move across your photograph in arcs. These can be anywhere from
an exposure of 1 minute to almost 12 hours and capturing them is simple. The
most popular of these pictures is of the North and South celestial poles,
showing clearly the Earth's rotation on its axis and the stars in the polar
region.
The film that is required for these photos is film with an ASA
rating of about 50 or greater. The higher the rating the more stars you will
record on your film and the shorter your exposure can be to achieve the desired
effect.
ASA 50 to 200 films need exposures of at least 30 minutes
whereas 400 ASA will give you star trails after a few minutes. Films I have
found to be good are Konica 400, Fuji 400 and Agfa professional films, but
unlike many I have not used slide films due to the cost involved.
For
very long exposures you need a relatively slow film so as to not over expose or
get too much sky fog, which is what you get when background light such as street
lights get recorded on your photo. This causes a wash out of the detail you have
recorded. This is especially a problem when close to a town or city on a moist
night, the water in the air tends to scatter the stray light in the atmosphere
and makes this problem worse.
It is best to practice astrophotography at
a dark site but if you are in a light polluted area, then keep your exposure as
short as possible and take your pictures as close to directly overhead as
possible.
Set your camera to B on your shutter speed control, set the
focus at infinity and have your lens aperture stopped down one f-stop from wide
open, this minimizes the stretching of star images at the edge of the field by
irregularities in your lens near the edges. Be sure to record the details of
your exposures, such as date, time, object, lens & film. This will save a
lot of pain later when trying to identify your exposures.
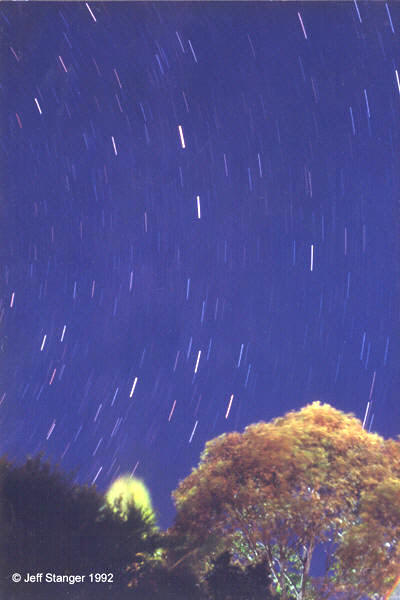
The trick to a
good star trail is to include an interesting foreground feature such as trees,
mountains, buildings, etc. This makes for very attractive photo's and gives the
picture perspective and depth.
A more sophisticated example of star
trails is achieved by taking an exposure of an hour or more and every ten
minutes or so, defocusing slightly. This will cause your star trails to fan out
in steps, highlighting the true colours of the stars.
The Southern
Cross and Pointers
Taken from Ballina, Northern NSW
Konica 400, 10 min @
f/1.8
unguided, using a 50mm lens
Constellations:
The second type of
photograph you might like to try is still pictures of the constellations, the
Milky Way, or the Magellanic Clouds. There are two
general rules and a formula to be used for these. The general rules are if you
double your film speed or ASA rating, you approximately halve your exposure time
and if you open your lens one f-stop, you approximately double your exposure.
These may help you choosing film, f-stops and exposure times. They have also
come in handy when trying a similar exposure to one you have done before on
different films etc.
The formula for a 35mm format camera for
determining the limiting time for your exposures before trailing occurs on your
photograph is as follows:
T=1000/(F.cosD)
Where:
T =
time exposure in seconds.
F = focal length of your lens in mm.
D =
declination of the object in question in degrees.
Find the declination
of the object in any sky atlas or star chart. As a rough guide declination is
zero degrees at the celestial equator, +90 degrees at the North celestial pole
and -90 degrees at the South celestial pole. The focal length of the lens should
be written on the lens. I use a 50mm lens, which is standard on most SLR
cameras.
When photographing your object, bracket several shots around
your target exposure. For example if your target exposure is 36 seconds then try
a few more exposures say at 30 and 40 seconds.
Film selection for these
photos is a trade off between film speed and grain size. Popular print films are
Kodak Ektar 1000 (now Royal Gold), Fuji 1600 and Konica 3200. Fuji 1600 is a
good trade off but more advanced amateurs may like to try hypersensitised film,
giving fast speed with finer grain.
Both of these types of photographs
can be processed at your local photo lab (except for hypered film). Ask around
for someone who has dealt with astrophotography before and you will have a
better chance of them getting it right first time.
One way to save some
money is to ask your photo lab to only develop your negatives. You can then
choose which ones are worth printing. Don't be afraid to ask questions and tell
them exactly what you want. You can get them to vary the sky colour in your
prints to get the most out of the ones you like and you will be amazed at the
difference between laboratories, once you find a good one you will be very
happy.
Although some in the amateur ranks see astrophotography as some
sort of disease, it has opened a door to a practical astronomy when a decent
telescope is out of my reach.
Good luck and clear skies to all.
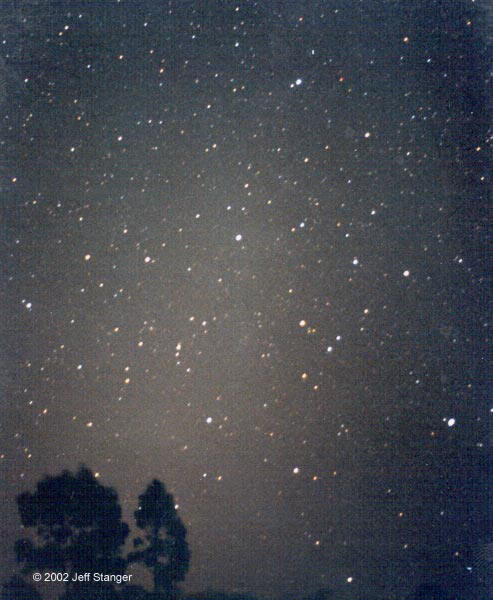
The Zodiacal
Light
Taken from Wiruna
Konica 3200, 40 sec @ f/1.8
unguided, using
a 50mm lens

The constellation Canis Major (the big dog) next to the Parkes Radio Telescope.
Simple Astrophotography | Home | Astronomy | Astrophotography | Science | Space Science | Astrobiology | Science Teaching | Related Links | Contact Me